




Learning how to add voiceover in Premiere Pro can make an edit easier to follow, more polished, and more accessible. Whether you record narration directly in Premiere Pro or generate it first with Typecast, the basic process is the same: get the audio into your project, place it on the timeline, sync it to the video, mix it with other sound, and export the completed edit.
This walkthrough follows Adobe’s published instructions for adding external audio, arranging it in a sequence and exporting a finished edit. The Typecast source audio was exported separately; the Premiere steps are documentation-based, not an independently completed editor test. Official screenshots are Adobe examples, and interface details may vary by version.
Before you add narration to your timeline
Have these items ready before opening your edit:
- A Premiere Pro project with your video clips organized in a sequence
- A finished or near-finished narration script
- Your Typecast voiceover exported as an audio file
- A quiet audio workspace if you plan to record directly in Premiere Pro
- A pair of headphones for checking timing, volume, and unwanted background noise
Narration is easiest to place after the general structure of the video is in place. You do not need every transition or visual effect completed, but major scenes should be arranged so you can match the script to the intended visuals.
If you are still building the edit, this broader guide to using an AI video editor can help you plan the video workflow before you begin final audio work.
Create and export your Typecast narration
Start by preparing the script you want to use in the video. Break longer copy into short sections that correspond to scenes, slides, or shots. This makes it easier to revise one line without having to replace an entire narration track.
Use Typecast to create a text-to-speech voiceover from your script. Before exporting, listen through the full narration and check for pronunciation, pacing, pauses, and tone. A voice that sounds natural on its own may need a slightly slower pace once it is paired with on-screen action.
When the narration is ready, export the audio from Typecast. Note the file name and save location so you can find it quickly in Premiere Pro. For longer projects, use a clear naming convention, such as:
- project-name_narration_v01
- project-name_scene-03_narration_v02
A scene-based export can be useful when several people are reviewing a project or when the script is likely to change. A single full-length file can be simpler for a short video with minimal revisions.
Choose an export format intentionally
The Typecast samples prepared alongside this guide were exported as mono, 44.1 kHz, 16-bit PCM WAV files. This is verified source-file evidence, not a completed Premiere import test. Check the export options available in your account and confirm the file imports and plays in your project before preparing a large batch.
For a production handoff, include the original exported audio files rather than sending only a compressed copy through a messaging app. Re-compressing narration can make later mixing more difficult and can introduce audible artifacts.
Import the Typecast audio into Premiere Pro
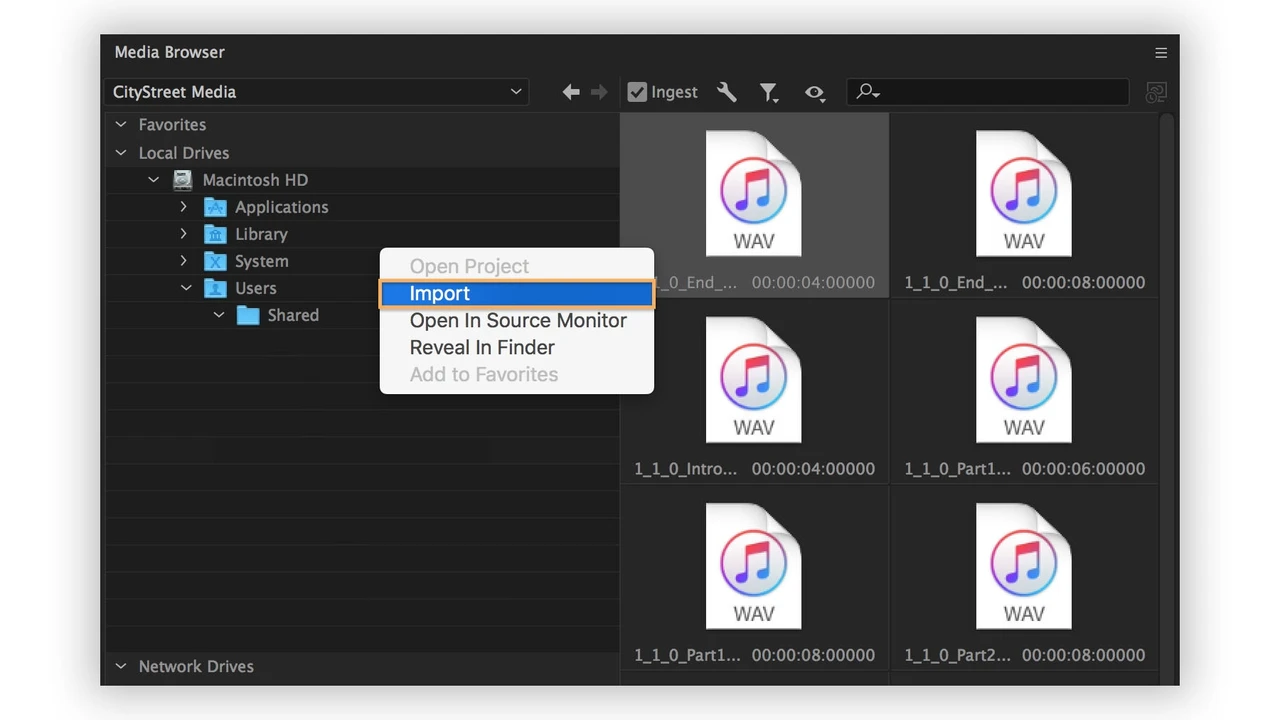

Typecast narration is added to Premiere Pro through a manual media import workflow. Do not assume there is a native Typecast-Premiere Pro integration unless it has been specifically verified for your account and version.
To import the exported narration:
1. Open your Premiere Pro project.
2. Select the Project panel.
3. Choose File > Import, or use the import option available in the Project panel.
4. Locate the audio file exported from Typecast.
5. Select the file and import it into the project.
6. Find the imported clip in the Project panel and drag it to an empty audio track in your sequence.
Adobe’s Add audio to your video tutorial demonstrates importing WAV files through the Media Browser, previewing a clip in the Source panel and dragging it onto an audio track. This external-file workflow is separate from recording a microphone directly onto the timeline.
After importing, play the file in the Project panel or timeline to confirm that it is the correct version and that audio is present. If the clip does not import as expected, confirm the exported file opens normally outside Premiere Pro, then recheck its format and export settings in Typecast.
Put the voiceover on the right audio track
Place narration on its own dedicated audio track whenever possible. Keeping dialogue or voiceover separate from music, sound effects, and location audio makes the mix easier to manage later.
For example, you might organize a sequence like this:
- A1: Typecast narration or spoken dialogue
- A2: Background music
- A3: Sound effects
- A4: Original camera audio or ambient sound
Drag the narration clip to the beginning of the relevant scene. If the full voiceover covers the entire video, place it at the start of the sequence and then adjust individual video clips to match the narration. If the narration is divided by scene, place each clip beneath its corresponding video section.
Rename tracks clearly, especially on projects with multiple languages, alternate takes, or revision rounds. Labels such as “Narration,” “Music,” and “SFX” are more useful than leaving the default track names in place.
Sync the voiceover with video

The best synchronization method depends on how your edit was planned. For a script-led explainer or tutorial, it is often easiest to build visuals around the narration. For a video that was edited first, you may need to trim pauses or reposition clips to fit the existing timing.
Start by aligning a clear spoken cue with a visual event. For example, if the narrator says, “Select Export,” place that phrase where the export screen appears. Then continue through the timeline, checking one section at a time.
Use these techniques to make synchronization more precise:
Zoom in on the timeline
Zooming in lets you place audio edits more accurately. This is particularly helpful for short narration clips, screen recordings, or videos where the voice needs to match a button click or on-screen demonstration.
Add markers for key lines
Add sequence markers at important phrases, scene changes, or CTA moments. Markers provide a visual map of the script and can speed up review feedback.
Leave room for natural pauses
Do not cut every pause out of generated narration. Brief pauses can give viewers time to read on-screen text, process an instruction, or absorb a transition. If a pause feels too long, trim it carefully rather than making many aggressive cuts throughout the file.
Use audio transitions sparingly
When joining two narration clips, a short audio crossfade can help avoid abrupt changes. Keep transitions subtle. A noticeable fade may sound unnatural if it occurs in the middle of a sentence or between closely connected ideas.
Mix narration with music and other audio

Once the narration is in place, listen to the full sequence from beginning to end. Your goal is not simply to make every track loud; it is to make the spoken message easy to understand.
Lower background music when narration begins, then raise it gradually during pauses or sections without speech. If music competes with the voice, reduce the music level before making the narration excessively loud.
Check the following during your mix:
- Is every spoken word understandable?
- Does music distract from the narration?
- Are there sudden volume changes between clips?
- Do sound effects cover important words?
- Does the narration remain consistent from scene to scene?
Adobe’s voice-over audio tutorial provides additional context on working with voice-over audio in Premiere Pro.
Listen on headphones first, then check on another playback device if possible. A mix that seems clear on studio headphones may sound different on laptop speakers or a phone.
Record a voiceover directly in Premiere Pro instead
If you need a live, human-recorded take, Premiere Pro can record voice-over directly onto an audio track from the timeline. This is different from importing a Typecast-generated audio file.
Direct recording can be useful when you need to react to the timing of a finished edit, record a quick pickup line, or capture a temporary guide track for an editor. Before recording, confirm that Premiere Pro is using the correct microphone input and that the selected audio track is armed for recording.
Use headphones while recording to prevent speaker output from being captured by the microphone. Record a short test first, listen back for level and noise issues, and then record the final take.
For consistent narration across multiple revisions, keep the script, voice settings, and exported file versions organized. Whether the audio comes from Typecast or a microphone, version control prevents an outdated line from accidentally reaching the final export.
Export the finished video
After syncing and mixing the voiceover, play the full sequence one final time. Check that narration begins and ends where expected, that no audio clips are muted unintentionally, and that the final frame does not cut off a spoken word.
Adobe documents File > Export > Media for the selected sequence. Choose the output format and preset, then check the video and audio settings against the delivery requirements. Select Export to render in Premiere, or send the job to Adobe Media Encoder. Review the resulting file for audible, synchronized narration before delivery.
A clear workflow is simple: generate or record the narration, import it manually, place it on a dedicated track, sync it to the edit, mix it against other audio, and verify the exported result. With those steps in place, adding voiceover in Premiere Pro becomes a repeatable part of your video production process.